Choose year
A PHP Error was encountered
Severity: Warning
Message: date(): It is not safe to rely on the system's timezone settings. You are *required* to use the date.timezone setting or the date_default_timezone_set() function. In case you used any of those methods and you are still getting this warning, you most likely misspelled the timezone identifier. We selected the timezone 'UTC' for now, but please set date.timezone to select your timezone.
Filename: partials/_selector.php
Line Number: 32
2025
A PHP Error was encountered
Severity: Warning
Message: date(): It is not safe to rely on the system's timezone settings. You are *required* to use the date.timezone setting or the date_default_timezone_set() function. In case you used any of those methods and you are still getting this warning, you most likely misspelled the timezone identifier. We selected the timezone 'UTC' for now, but please set date.timezone to select your timezone.
Filename: partials/_selector.php
Line Number: 32
2024
A PHP Error was encountered
Severity: Warning
Message: date(): It is not safe to rely on the system's timezone settings. You are *required* to use the date.timezone setting or the date_default_timezone_set() function. In case you used any of those methods and you are still getting this warning, you most likely misspelled the timezone identifier. We selected the timezone 'UTC' for now, but please set date.timezone to select your timezone.
Filename: partials/_selector.php
Line Number: 32
2023
A PHP Error was encountered
Severity: Warning
Message: date(): It is not safe to rely on the system's timezone settings. You are *required* to use the date.timezone setting or the date_default_timezone_set() function. In case you used any of those methods and you are still getting this warning, you most likely misspelled the timezone identifier. We selected the timezone 'UTC' for now, but please set date.timezone to select your timezone.
Filename: partials/_selector.php
Line Number: 32
2022
A PHP Error was encountered
Severity: Warning
Message: date(): It is not safe to rely on the system's timezone settings. You are *required* to use the date.timezone setting or the date_default_timezone_set() function. In case you used any of those methods and you are still getting this warning, you most likely misspelled the timezone identifier. We selected the timezone 'UTC' for now, but please set date.timezone to select your timezone.
Filename: partials/_selector.php
Line Number: 32
2021
A PHP Error was encountered
Severity: Warning
Message: date(): It is not safe to rely on the system's timezone settings. You are *required* to use the date.timezone setting or the date_default_timezone_set() function. In case you used any of those methods and you are still getting this warning, you most likely misspelled the timezone identifier. We selected the timezone 'UTC' for now, but please set date.timezone to select your timezone.
Filename: partials/_selector.php
Line Number: 32
2020
A PHP Error was encountered
Severity: Warning
Message: date(): It is not safe to rely on the system's timezone settings. You are *required* to use the date.timezone setting or the date_default_timezone_set() function. In case you used any of those methods and you are still getting this warning, you most likely misspelled the timezone identifier. We selected the timezone 'UTC' for now, but please set date.timezone to select your timezone.
Filename: partials/_selector.php
Line Number: 32
2019
A PHP Error was encountered
Severity: Warning
Message: date(): It is not safe to rely on the system's timezone settings. You are *required* to use the date.timezone setting or the date_default_timezone_set() function. In case you used any of those methods and you are still getting this warning, you most likely misspelled the timezone identifier. We selected the timezone 'UTC' for now, but please set date.timezone to select your timezone.
Filename: partials/_selector.php
Line Number: 32
2018
A PHP Error was encountered
Severity: Warning
Message: date(): It is not safe to rely on the system's timezone settings. You are *required* to use the date.timezone setting or the date_default_timezone_set() function. In case you used any of those methods and you are still getting this warning, you most likely misspelled the timezone identifier. We selected the timezone 'UTC' for now, but please set date.timezone to select your timezone.
Filename: partials/_selector.php
Line Number: 32
2017
A PHP Error was encountered
Severity: Warning
Message: date(): It is not safe to rely on the system's timezone settings. You are *required* to use the date.timezone setting or the date_default_timezone_set() function. In case you used any of those methods and you are still getting this warning, you most likely misspelled the timezone identifier. We selected the timezone 'UTC' for now, but please set date.timezone to select your timezone.
Filename: partials/_selector.php
Line Number: 32
2016
A PHP Error was encountered
Severity: Warning
Message: date(): It is not safe to rely on the system's timezone settings. You are *required* to use the date.timezone setting or the date_default_timezone_set() function. In case you used any of those methods and you are still getting this warning, you most likely misspelled the timezone identifier. We selected the timezone 'UTC' for now, but please set date.timezone to select your timezone.
Filename: partials/_selector.php
Line Number: 32
2015
A PHP Error was encountered
Severity: Warning
Message: date(): It is not safe to rely on the system's timezone settings. You are *required* to use the date.timezone setting or the date_default_timezone_set() function. In case you used any of those methods and you are still getting this warning, you most likely misspelled the timezone identifier. We selected the timezone 'UTC' for now, but please set date.timezone to select your timezone.
Filename: partials/_selector.php
Line Number: 32
2014
A PHP Error was encountered
Severity: Warning
Message: date(): It is not safe to rely on the system's timezone settings. You are *required* to use the date.timezone setting or the date_default_timezone_set() function. In case you used any of those methods and you are still getting this warning, you most likely misspelled the timezone identifier. We selected the timezone 'UTC' for now, but please set date.timezone to select your timezone.
Filename: partials/_selector.php
Line Number: 32
2013
A PHP Error was encountered
Severity: Warning
Message: date(): It is not safe to rely on the system's timezone settings. You are *required* to use the date.timezone setting or the date_default_timezone_set() function. In case you used any of those methods and you are still getting this warning, you most likely misspelled the timezone identifier. We selected the timezone 'UTC' for now, but please set date.timezone to select your timezone.
Filename: partials/_selector.php
Line Number: 32
2012
A PHP Error was encountered
Severity: Warning
Message: date(): It is not safe to rely on the system's timezone settings. You are *required* to use the date.timezone setting or the date_default_timezone_set() function. In case you used any of those methods and you are still getting this warning, you most likely misspelled the timezone identifier. We selected the timezone 'UTC' for now, but please set date.timezone to select your timezone.
Filename: partials/_selector.php
Line Number: 32
2011
A PHP Error was encountered
Severity: Warning
Message: date(): It is not safe to rely on the system's timezone settings. You are *required* to use the date.timezone setting or the date_default_timezone_set() function. In case you used any of those methods and you are still getting this warning, you most likely misspelled the timezone identifier. We selected the timezone 'UTC' for now, but please set date.timezone to select your timezone.
Filename: partials/_selector.php
Line Number: 32
2010
A PHP Error was encountered
Severity: Warning
Message: date(): It is not safe to rely on the system's timezone settings. You are *required* to use the date.timezone setting or the date_default_timezone_set() function. In case you used any of those methods and you are still getting this warning, you most likely misspelled the timezone identifier. We selected the timezone 'UTC' for now, but please set date.timezone to select your timezone.
Filename: partials/_selector.php
Line Number: 32
2009
A PHP Error was encountered
Severity: Warning
Message: date(): It is not safe to rely on the system's timezone settings. You are *required* to use the date.timezone setting or the date_default_timezone_set() function. In case you used any of those methods and you are still getting this warning, you most likely misspelled the timezone identifier. We selected the timezone 'UTC' for now, but please set date.timezone to select your timezone.
Filename: partials/_selector.php
Line Number: 32
2008
A PHP Error was encountered
Severity: Warning
Message: date(): It is not safe to rely on the system's timezone settings. You are *required* to use the date.timezone setting or the date_default_timezone_set() function. In case you used any of those methods and you are still getting this warning, you most likely misspelled the timezone identifier. We selected the timezone 'UTC' for now, but please set date.timezone to select your timezone.
Filename: partials/_selector.php
Line Number: 32
2007
A PHP Error was encountered
Severity: Warning
Message: date(): It is not safe to rely on the system's timezone settings. You are *required* to use the date.timezone setting or the date_default_timezone_set() function. In case you used any of those methods and you are still getting this warning, you most likely misspelled the timezone identifier. We selected the timezone 'UTC' for now, but please set date.timezone to select your timezone.
Filename: partials/_selector.php
Line Number: 32
2006
A PHP Error was encountered
Severity: Warning
Message: date(): It is not safe to rely on the system's timezone settings. You are *required* to use the date.timezone setting or the date_default_timezone_set() function. In case you used any of those methods and you are still getting this warning, you most likely misspelled the timezone identifier. We selected the timezone 'UTC' for now, but please set date.timezone to select your timezone.
Filename: partials/_selector.php
Line Number: 32
2005
A PHP Error was encountered
Severity: Warning
Message: date(): It is not safe to rely on the system's timezone settings. You are *required* to use the date.timezone setting or the date_default_timezone_set() function. In case you used any of those methods and you are still getting this warning, you most likely misspelled the timezone identifier. We selected the timezone 'UTC' for now, but please set date.timezone to select your timezone.
Filename: partials/_selector.php
Line Number: 32
2004
A PHP Error was encountered
Severity: Warning
Message: date(): It is not safe to rely on the system's timezone settings. You are *required* to use the date.timezone setting or the date_default_timezone_set() function. In case you used any of those methods and you are still getting this warning, you most likely misspelled the timezone identifier. We selected the timezone 'UTC' for now, but please set date.timezone to select your timezone.
Filename: partials/_selector.php
Line Number: 32
2003
A PHP Error was encountered
Severity: Warning
Message: date(): It is not safe to rely on the system's timezone settings. You are *required* to use the date.timezone setting or the date_default_timezone_set() function. In case you used any of those methods and you are still getting this warning, you most likely misspelled the timezone identifier. We selected the timezone 'UTC' for now, but please set date.timezone to select your timezone.
Filename: partials/_selector.php
Line Number: 32
2002
A PHP Error was encountered
Severity: Warning
Message: date(): It is not safe to rely on the system's timezone settings. You are *required* to use the date.timezone setting or the date_default_timezone_set() function. In case you used any of those methods and you are still getting this warning, you most likely misspelled the timezone identifier. We selected the timezone 'UTC' for now, but please set date.timezone to select your timezone.
Filename: partials/_selector.php
Line Number: 32
2001
A PHP Error was encountered
Severity: Warning
Message: date(): It is not safe to rely on the system's timezone settings. You are *required* to use the date.timezone setting or the date_default_timezone_set() function. In case you used any of those methods and you are still getting this warning, you most likely misspelled the timezone identifier. We selected the timezone 'UTC' for now, but please set date.timezone to select your timezone.
Filename: partials/_selector.php
Line Number: 32
2000
A PHP Error was encountered
Severity: Warning
Message: date(): It is not safe to rely on the system's timezone settings. You are *required* to use the date.timezone setting or the date_default_timezone_set() function. In case you used any of those methods and you are still getting this warning, you most likely misspelled the timezone identifier. We selected the timezone 'UTC' for now, but please set date.timezone to select your timezone.
Filename: partials/_selector.php
Line Number: 32
1999
A PHP Error was encountered
Severity: Warning
Message: date(): It is not safe to rely on the system's timezone settings. You are *required* to use the date.timezone setting or the date_default_timezone_set() function. In case you used any of those methods and you are still getting this warning, you most likely misspelled the timezone identifier. We selected the timezone 'UTC' for now, but please set date.timezone to select your timezone.
Filename: partials/_selector.php
Line Number: 32
1998
A PHP Error was encountered
Severity: Warning
Message: date(): It is not safe to rely on the system's timezone settings. You are *required* to use the date.timezone setting or the date_default_timezone_set() function. In case you used any of those methods and you are still getting this warning, you most likely misspelled the timezone identifier. We selected the timezone 'UTC' for now, but please set date.timezone to select your timezone.
Filename: partials/_selector.php
Line Number: 32
1997
A PHP Error was encountered
Severity: Warning
Message: date(): It is not safe to rely on the system's timezone settings. You are *required* to use the date.timezone setting or the date_default_timezone_set() function. In case you used any of those methods and you are still getting this warning, you most likely misspelled the timezone identifier. We selected the timezone 'UTC' for now, but please set date.timezone to select your timezone.
Filename: partials/_selector.php
Line Number: 32
1996
A PHP Error was encountered
Severity: Warning
Message: date(): It is not safe to rely on the system's timezone settings. You are *required* to use the date.timezone setting or the date_default_timezone_set() function. In case you used any of those methods and you are still getting this warning, you most likely misspelled the timezone identifier. We selected the timezone 'UTC' for now, but please set date.timezone to select your timezone.
Filename: partials/_selector.php
Line Number: 32
1995
A PHP Error was encountered
Severity: Warning
Message: date(): It is not safe to rely on the system's timezone settings. You are *required* to use the date.timezone setting or the date_default_timezone_set() function. In case you used any of those methods and you are still getting this warning, you most likely misspelled the timezone identifier. We selected the timezone 'UTC' for now, but please set date.timezone to select your timezone.
Filename: partials/_selector.php
Line Number: 32
1994
A PHP Error was encountered
Severity: Warning
Message: date(): It is not safe to rely on the system's timezone settings. You are *required* to use the date.timezone setting or the date_default_timezone_set() function. In case you used any of those methods and you are still getting this warning, you most likely misspelled the timezone identifier. We selected the timezone 'UTC' for now, but please set date.timezone to select your timezone.
Filename: partials/_selector.php
Line Number: 32
1993
A PHP Error was encountered
Severity: Warning
Message: date(): It is not safe to rely on the system's timezone settings. You are *required* to use the date.timezone setting or the date_default_timezone_set() function. In case you used any of those methods and you are still getting this warning, you most likely misspelled the timezone identifier. We selected the timezone 'UTC' for now, but please set date.timezone to select your timezone.
Filename: partials/_selector.php
Line Number: 32
1992
A PHP Error was encountered
Severity: Warning
Message: date(): It is not safe to rely on the system's timezone settings. You are *required* to use the date.timezone setting or the date_default_timezone_set() function. In case you used any of those methods and you are still getting this warning, you most likely misspelled the timezone identifier. We selected the timezone 'UTC' for now, but please set date.timezone to select your timezone.
Filename: partials/_selector.php
Line Number: 32
1991
A PHP Error was encountered
Severity: Warning
Message: date(): It is not safe to rely on the system's timezone settings. You are *required* to use the date.timezone setting or the date_default_timezone_set() function. In case you used any of those methods and you are still getting this warning, you most likely misspelled the timezone identifier. We selected the timezone 'UTC' for now, but please set date.timezone to select your timezone.
Filename: partials/_selector.php
Line Number: 32
1990
A PHP Error was encountered
Severity: Warning
Message: date(): It is not safe to rely on the system's timezone settings. You are *required* to use the date.timezone setting or the date_default_timezone_set() function. In case you used any of those methods and you are still getting this warning, you most likely misspelled the timezone identifier. We selected the timezone 'UTC' for now, but please set date.timezone to select your timezone.
Filename: partials/_selector.php
Line Number: 32
1989
A PHP Error was encountered
Severity: Warning
Message: date(): It is not safe to rely on the system's timezone settings. You are *required* to use the date.timezone setting or the date_default_timezone_set() function. In case you used any of those methods and you are still getting this warning, you most likely misspelled the timezone identifier. We selected the timezone 'UTC' for now, but please set date.timezone to select your timezone.
Filename: partials/_selector.php
Line Number: 32
1988
A PHP Error was encountered
Severity: Warning
Message: date(): It is not safe to rely on the system's timezone settings. You are *required* to use the date.timezone setting or the date_default_timezone_set() function. In case you used any of those methods and you are still getting this warning, you most likely misspelled the timezone identifier. We selected the timezone 'UTC' for now, but please set date.timezone to select your timezone.
Filename: partials/_selector.php
Line Number: 32
1987
A PHP Error was encountered
Severity: Warning
Message: date(): It is not safe to rely on the system's timezone settings. You are *required* to use the date.timezone setting or the date_default_timezone_set() function. In case you used any of those methods and you are still getting this warning, you most likely misspelled the timezone identifier. We selected the timezone 'UTC' for now, but please set date.timezone to select your timezone.
Filename: partials/_selector.php
Line Number: 32
1986
A PHP Error was encountered
Severity: Warning
Message: date(): It is not safe to rely on the system's timezone settings. You are *required* to use the date.timezone setting or the date_default_timezone_set() function. In case you used any of those methods and you are still getting this warning, you most likely misspelled the timezone identifier. We selected the timezone 'UTC' for now, but please set date.timezone to select your timezone.
Filename: partials/_selector.php
Line Number: 32
1985
A PHP Error was encountered
Severity: Warning
Message: date(): It is not safe to rely on the system's timezone settings. You are *required* to use the date.timezone setting or the date_default_timezone_set() function. In case you used any of those methods and you are still getting this warning, you most likely misspelled the timezone identifier. We selected the timezone 'UTC' for now, but please set date.timezone to select your timezone.
Filename: partials/_selector.php
Line Number: 32
1984
A PHP Error was encountered
Severity: Warning
Message: date(): It is not safe to rely on the system's timezone settings. You are *required* to use the date.timezone setting or the date_default_timezone_set() function. In case you used any of those methods and you are still getting this warning, you most likely misspelled the timezone identifier. We selected the timezone 'UTC' for now, but please set date.timezone to select your timezone.
Filename: partials/_selector.php
Line Number: 32
1983
A PHP Error was encountered
Severity: Warning
Message: date(): It is not safe to rely on the system's timezone settings. You are *required* to use the date.timezone setting or the date_default_timezone_set() function. In case you used any of those methods and you are still getting this warning, you most likely misspelled the timezone identifier. We selected the timezone 'UTC' for now, but please set date.timezone to select your timezone.
Filename: partials/_selector.php
Line Number: 32
1982
A PHP Error was encountered
Severity: Warning
Message: date(): It is not safe to rely on the system's timezone settings. You are *required* to use the date.timezone setting or the date_default_timezone_set() function. In case you used any of those methods and you are still getting this warning, you most likely misspelled the timezone identifier. We selected the timezone 'UTC' for now, but please set date.timezone to select your timezone.
Filename: partials/_selector.php
Line Number: 32
1981
A PHP Error was encountered
Severity: Warning
Message: date(): It is not safe to rely on the system's timezone settings. You are *required* to use the date.timezone setting or the date_default_timezone_set() function. In case you used any of those methods and you are still getting this warning, you most likely misspelled the timezone identifier. We selected the timezone 'UTC' for now, but please set date.timezone to select your timezone.
Filename: partials/_selector.php
Line Number: 32
1980
A PHP Error was encountered
Severity: Warning
Message: date(): It is not safe to rely on the system's timezone settings. You are *required* to use the date.timezone setting or the date_default_timezone_set() function. In case you used any of those methods and you are still getting this warning, you most likely misspelled the timezone identifier. We selected the timezone 'UTC' for now, but please set date.timezone to select your timezone.
Filename: partials/_selector.php
Line Number: 32
1979
A PHP Error was encountered
Severity: Warning
Message: date(): It is not safe to rely on the system's timezone settings. You are *required* to use the date.timezone setting or the date_default_timezone_set() function. In case you used any of those methods and you are still getting this warning, you most likely misspelled the timezone identifier. We selected the timezone 'UTC' for now, but please set date.timezone to select your timezone.
Filename: partials/_selector.php
Line Number: 32
1978
A PHP Error was encountered
Severity: Warning
Message: date(): It is not safe to rely on the system's timezone settings. You are *required* to use the date.timezone setting or the date_default_timezone_set() function. In case you used any of those methods and you are still getting this warning, you most likely misspelled the timezone identifier. We selected the timezone 'UTC' for now, but please set date.timezone to select your timezone.
Filename: partials/_selector.php
Line Number: 32
1977
A PHP Error was encountered
Severity: Warning
Message: date(): It is not safe to rely on the system's timezone settings. You are *required* to use the date.timezone setting or the date_default_timezone_set() function. In case you used any of those methods and you are still getting this warning, you most likely misspelled the timezone identifier. We selected the timezone 'UTC' for now, but please set date.timezone to select your timezone.
Filename: partials/_selector.php
Line Number: 32
1976
A PHP Error was encountered
Severity: Warning
Message: date(): It is not safe to rely on the system's timezone settings. You are *required* to use the date.timezone setting or the date_default_timezone_set() function. In case you used any of those methods and you are still getting this warning, you most likely misspelled the timezone identifier. We selected the timezone 'UTC' for now, but please set date.timezone to select your timezone.
Filename: partials/_selector.php
Line Number: 32
1975
A PHP Error was encountered
Severity: Warning
Message: date(): It is not safe to rely on the system's timezone settings. You are *required* to use the date.timezone setting or the date_default_timezone_set() function. In case you used any of those methods and you are still getting this warning, you most likely misspelled the timezone identifier. We selected the timezone 'UTC' for now, but please set date.timezone to select your timezone.
Filename: partials/_selector.php
Line Number: 32
1974
A PHP Error was encountered
Severity: Warning
Message: date(): It is not safe to rely on the system's timezone settings. You are *required* to use the date.timezone setting or the date_default_timezone_set() function. In case you used any of those methods and you are still getting this warning, you most likely misspelled the timezone identifier. We selected the timezone 'UTC' for now, but please set date.timezone to select your timezone.
Filename: partials/_selector.php
Line Number: 32
1973
A PHP Error was encountered
Severity: Warning
Message: date(): It is not safe to rely on the system's timezone settings. You are *required* to use the date.timezone setting or the date_default_timezone_set() function. In case you used any of those methods and you are still getting this warning, you most likely misspelled the timezone identifier. We selected the timezone 'UTC' for now, but please set date.timezone to select your timezone.
Filename: partials/_selector.php
Line Number: 32
1972
A PHP Error was encountered
Severity: Warning
Message: date(): It is not safe to rely on the system's timezone settings. You are *required* to use the date.timezone setting or the date_default_timezone_set() function. In case you used any of those methods and you are still getting this warning, you most likely misspelled the timezone identifier. We selected the timezone 'UTC' for now, but please set date.timezone to select your timezone.
Filename: partials/_selector.php
Line Number: 32
1971
A PHP Error was encountered
Severity: Warning
Message: date(): It is not safe to rely on the system's timezone settings. You are *required* to use the date.timezone setting or the date_default_timezone_set() function. In case you used any of those methods and you are still getting this warning, you most likely misspelled the timezone identifier. We selected the timezone 'UTC' for now, but please set date.timezone to select your timezone.
Filename: partials/_selector.php
Line Number: 32
1970
A PHP Error was encountered
Severity: Warning
Message: date(): It is not safe to rely on the system's timezone settings. You are *required* to use the date.timezone setting or the date_default_timezone_set() function. In case you used any of those methods and you are still getting this warning, you most likely misspelled the timezone identifier. We selected the timezone 'UTC' for now, but please set date.timezone to select your timezone.
Filename: partials/_selector.php
Line Number: 32
1969
A PHP Error was encountered
Severity: Warning
Message: date(): It is not safe to rely on the system's timezone settings. You are *required* to use the date.timezone setting or the date_default_timezone_set() function. In case you used any of those methods and you are still getting this warning, you most likely misspelled the timezone identifier. We selected the timezone 'UTC' for now, but please set date.timezone to select your timezone.
Filename: partials/_selector.php
Line Number: 32
1968
A PHP Error was encountered
Severity: Warning
Message: date(): It is not safe to rely on the system's timezone settings. You are *required* to use the date.timezone setting or the date_default_timezone_set() function. In case you used any of those methods and you are still getting this warning, you most likely misspelled the timezone identifier. We selected the timezone 'UTC' for now, but please set date.timezone to select your timezone.
Filename: partials/_selector.php
Line Number: 32
1967
A PHP Error was encountered
Severity: Warning
Message: date(): It is not safe to rely on the system's timezone settings. You are *required* to use the date.timezone setting or the date_default_timezone_set() function. In case you used any of those methods and you are still getting this warning, you most likely misspelled the timezone identifier. We selected the timezone 'UTC' for now, but please set date.timezone to select your timezone.
Filename: partials/_selector.php
Line Number: 32
1966
A PHP Error was encountered
Severity: Warning
Message: date(): It is not safe to rely on the system's timezone settings. You are *required* to use the date.timezone setting or the date_default_timezone_set() function. In case you used any of those methods and you are still getting this warning, you most likely misspelled the timezone identifier. We selected the timezone 'UTC' for now, but please set date.timezone to select your timezone.
Filename: partials/_selector.php
Line Number: 32

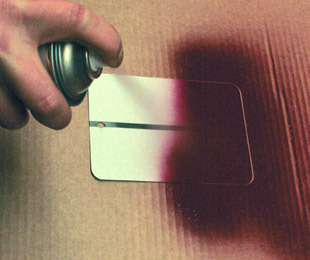
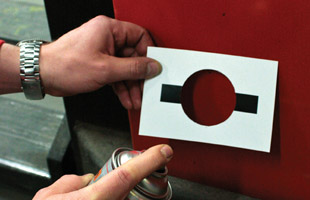
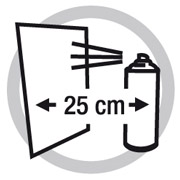 by spray technique. When the spraying distance is closer, the paint becomes ”more moist” and the colour tone will be darker. When the distance is greater, paint layer is ”drier” and the colour tone lighter.